
The first month in a new home can feel like one long moving day. There are boxes in every room, unfamiliar switches on the walls, documents to organize, services to confirm, and dozens of ideas for what you might want to change. When everything seems urgent, it is easy to spend time and money on the wrong things.
Your first 30 days are not about finishing the house. They are about making it safe, learning how it works, and creating a few simple systems that will make the following months easier.
This checklist is organized by time rather than by room. The first few days focus on safety and basic function. The following weeks help you understand the property, organize important information, settle into the space, and decide what truly deserves your attention. You may move faster or slower depending on the condition of the home, your schedule, and the time of year.
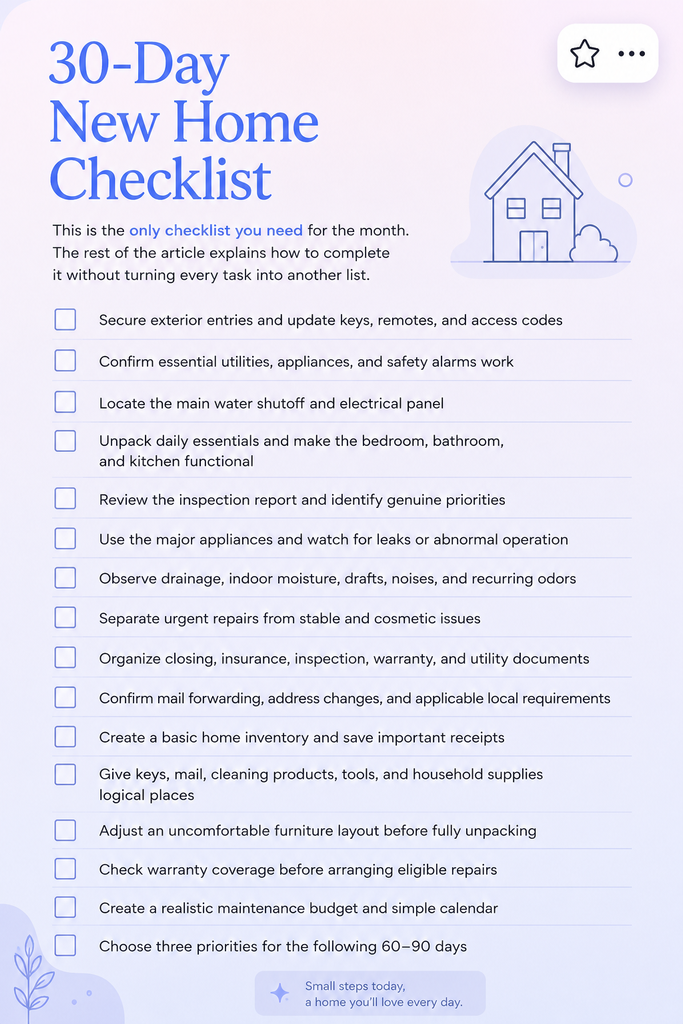
Your 30-Day New Home Checklist
This is the only checklist you need for the month. The rest of the article explains how to complete it without turning every task into another list.
Days 1–3: Make the Home Safe and Livable
During the first three days, concentrate on what affects your ability to enter, sleep, shower, eat, and respond to an emergency. Decorating and perfect organization can wait.
Start by making sure you control access to the property. Test every key and remote, update garage and keypad codes, and remove any previous users from smart locks or connected security devices. If a device remains attached to a former owner’s account, follow its official transfer or reset process.
Walk through the home while there is still daylight. Look for broken glass, doors or windows that do not latch, unstable steps, loose handrails, exposed wiring, pooled water, or other conditions that could cause immediate harm. You are not trying to create a complete repair list yet; you are identifying anything that affects safety tonight.
Run hot and cold water, flush the toilets, turn on several lights, and confirm that the thermostat responds. Check that the refrigerator is cooling and that essential equipment has power. If you smell gas, see smoke, hear hissing near a gas line, or suspect an immediate electrical danger, leave the area and contact the appropriate emergency service or utility from a safe location.
Keep the main water shutoff and electrical panel accessible instead of surrounding them with boxes. Do not force an unfamiliar valve, remove an electrical panel cover, or attempt to diagnose gas or internal electrical problems yourself.
Days 1–7: Unpack for Daily Life, Not for Perfection
The goal of the first week is to create a functional bedroom, bathroom, and kitchen. Once those areas work, the rest of the boxes can be handled gradually.
After moving several times, I have found it much easier to keep immediate essentials in a suitcase or clearly marked bag. I would rather know exactly where my medication, charger, clean clothes, toiletries, and important documents are than search through six boxes after a tiring day.
Set up the bed before working on decorative items. Stock one bathroom rather than partially unpacking every bathroom in the house. In the kitchen, unpack only what you need for simple meals and basic cleaning. This gives you a normal daily routine while the rest of the home is still in progress.
Avoid opening boxes randomly. Sort them into broad groups and finish one useful area at a time. Flatten empty cartons, contain packing material, and keep hallways and exits clear. A room does not have to look finished to function well.
Week 2: Learn How the House Actually Works
During the second week, move from immediate setup to observation. This is when you begin noticing how the home behaves during ordinary use.
Revisit the inspection report
The inspection report may have felt abstract before closing. After living in the home for a week, many of its notes will make more sense. You now know which door sticks, how the showers drain, whether a room feels unusually warm, and which appliance sounds different from what you expected.
Read the report again and create three categories:
- Act now: safety concerns, active water intrusion, loss of an essential service, or damage that is getting worse.
- Plan soon: stable repairs that affect daily function or should be evaluated within the next few months.
- Monitor: conditions that are currently stable but should be photographed and checked again.
The purpose is not to hire a long list of contractors automatically. Check what the inspector observed, compare it with what you see now, and seek qualified help only when the condition calls for it.
Use the appliances under normal conditions
The first month is a good time to learn which appliances belong to the property and whether they operate normally. Run the dishwasher, washing machine, oven, cooktop, and other included equipment separately. Look for leaks, drainage problems, error messages, abnormal heat, or damaged visible connections.
Do not dismantle an appliance to investigate a checklist item. Stop using equipment that smells as if it is burning, repeatedly trips a breaker, leaks significantly, or appears unsafe. Record the model and serial number only when the label is safely accessible.
Observe the home instead of rushing to change it
Spend time in each room at different points of the day. Notice natural light, street noise, privacy, temperature, airflow, and the routes people naturally take through the house. Check where coats, shoes, bags, mail, laundry, and cleaning supplies actually tend to collect.
These observations are more useful than designing every storage system before you have lived in the space. They reveal what the home needs rather than what looked attractive in an empty room.
If it rains during the first month, observe drainage safely from the ground. Note overflowing gutters, water collecting near the house, leaks around windows, or new interior stains. You are gathering information, not climbing onto the roof during or after a storm.
Week 3: Organize the Information Behind the Home
By the third week, the most urgent boxes should be under control. This is a good moment to organize the documents, contacts, and practical information that are easy to lose after a move.
Create a home file that is easy to maintain
You do not need an elaborate binder with perfectly designed pages. Start with one physical folder, digital folder, or simple combination of both. Keep the following together:
- closing and inspection documents;
- homeowners insurance information;
- manuals and warranties;
- utility account details;
- receipts for repairs and major purchases;
- contractor invoices and service notes;
- HOA information, if applicable;
- a simple maintenance and repair record.
Use clear names for digital files and avoid storing the only copy of an important document on one device. Sensitive paperwork should be kept somewhere secure rather than in an open box near an entryway.
Confirm address and local administrative tasks
Check that mail forwarding is working and update your address with banks, insurers, employers, subscriptions, healthcare providers, and other organizations that need accurate information. Use official websites rather than advertisements that imitate government services.
Driver’s license, vehicle registration, voter registration, property records, tax-related filings, and possible homeowner exemptions vary by state and county. Check the relevant official state and local websites for the requirements and deadlines that apply to you. Do not assume that a task is complete simply because your mailing address changed.
Confirm that utilities are correctly assigned and that providers have accurate contact information. Learn the trash and recycling schedule, mailbox procedure, parking rules, and any HOA requirements that affect bins, exterior changes, or move-in debris.
Build a basic home inventory
Photograph rooms and higher-value belongings for your own records. Include identifying details and receipts when available, but do not post serial numbers or sensitive documents publicly. Store the inventory securely and update it after significant purchases.
This does not need to become a full-day photography project. A simple room-by-room record is more useful than waiting indefinitely for a perfect inventory.
Week 3: Give Everyday Things a Logical Place
Organization becomes easier once you have observed how you use the home. Instead of buying containers for every room, decide where broad categories should live.
I prefer to settle in first and organize gradually instead of forcing every room to be finished immediately. Once I understand how I am using a space, I can decide where groups of things should actually live rather than stacking them wherever there happens to be room.
Start with the areas that create daily friction. If keys are repeatedly misplaced, create one landing point. If unopened mail moves between several surfaces, give it an inbox and choose a regular time to handle it. If household supplies are scattered, group them in a safe, accessible location.
Store cleaning products, batteries, tools, and other supplies according to their safety instructions and away from children, pets, heat, and ignition sources when required. Never block the electrical panel, HVAC equipment, vents, main shutoff, or exits with storage.
Wait before purchasing large sets of matching organizers. Measure first and buy only when you understand the problem a product needs to solve. The right system should make ordinary life easier, not simply make a shelf look finished.
Week 4: Decide What Deserves Time and Money
The fourth week is when you turn observations into a realistic plan. By now, you have lived with the layout, used the equipment, received mail and bills, and noticed which problems continue to bother you.
Build a repair list with real priorities
Do not keep one enormous list that treats a dripping connection, a paint color you dislike, and an unsafe railing as equal problems. Divide your list by consequence.
Handle safety hazards, active leaks, possible electrical or gas problems, sewage issues, and conditions causing rapid damage first. Schedule stable repairs that affect everyday use next. Keep decoration, upgrades, and optional improvements in a separate section.
In my experience, leaving a small problem rarely makes it easier. If something is broken, I prefer to address it while it is still manageable. That may mean completing a safe, simple fix, checking the warranty, stopping use of an appliance, or contacting the appropriate professional. Being prompt does not mean attempting technical work you are not qualified to perform.
Check the warranty before arranging work
If the home is newly built, review the builder’s warranty process and reporting deadlines. Document defects with dates and clear photographs, and submit them through the stated channel. If an appliance or recent repair has a warranty, check its terms before authorizing new work that could affect coverage.
Keep copies of messages, appointments, reports, and receipts. A verbal promise is harder to track than a written record.
Create a simple financial starting point
The first month can be expensive, so separate immediate needs from optional purchases. Review what you have already spent on moving, repairs, supplies, and furnishings. Then create a dedicated savings category for maintenance and unexpected home costs.
There is no single maintenance amount that fits every property. Age, size, climate, equipment condition, previous upkeep, and local labor costs all affect the figure. Use the inspection findings and known repairs to set a realistic initial target, then adjust it as you learn more about the house.
Choose the next three priorities
At the end of the month, choose only three meaningful goals for the following 60–90 days. For example, you might schedule one repair, finish organizing a high-use area, and begin saving for a larger future project.
Limiting the list does not mean ignoring the house. It means deciding what you can complete properly instead of starting ten projects and leaving all of them half-finished.
Adjust the Furniture Before You Commit to the Layout
Furniture placement deserves its own moment during the first month because it affects how comfortable the entire house feels.
If the first layout does not feel comfortable, I prefer to change it before unpacking everything. Moving a sofa or bed is much easier before shelves are full, decorations are installed, and every nearby box has been emptied.
Live with a basic arrangement for several days and notice where it creates friction. A sofa may interrupt the route through the room. A desk may receive harsh afternoon glare. A bed may block the outlet you use every night. A dining table may be technically suitable for the room but make movement uncomfortable.
Do not block heating or cooling vents, required equipment clearance, windows used for emergency escape, or access to electrical outlets. The best layout is not necessarily the one that fills the most space; it is the one that supports how you live.
Get to Know the Neighborhood and Local Services
A house does not operate in isolation. By the end of the first month, learn the basic services and contacts around it.
Neighbors can be a useful source of property-specific context, such as how the street drains during heavy rain, when waste is collected, or which local service providers are familiar with the area. Treat recommendations as leads to evaluate rather than automatic endorsements.
Save the official contact details for the water, electricity, gas, waste, and municipal services that apply to the property. If the region faces hurricanes, tornadoes, wildfire, flooding, extreme heat, or freezing temperatures, check guidance from local emergency authorities and adapt the home plan accordingly.
Things You Do Not Need to Finish in the First 30 Days
A long moving checklist can make it seem as though responsible homeowners must transform the entire property in one month. They do not.
You can usually wait before:
- decorating every room;
- buying organizers for every cabinet and closet;
- replacing functional fixtures solely for appearance;
- purchasing furniture to fill empty areas;
- painting the entire house;
- completing nonessential landscaping;
- organizing a garage, basement, or attic perfectly;
- starting several cosmetic renovations at once;
- deciding how every room will be used forever.
Waiting gives you information. You may discover that a room needs a different purpose, that storage works better elsewhere, or that an item you planned to replace is perfectly functional. Living in the home before making every decision can protect both your budget and your time.
This does not apply to safety hazards or damage that is actively worsening. A leaking pipe should not wait because you are “living with the space.” The distinction is between learning before making optional choices and postponing a genuine problem.
End-of-Month Review
Before the first 30 days end, spend half an hour reviewing what you have learned.
Ask yourself whether the entries are secure, the alarms work, the essential documents are organized, urgent hazards have been addressed, and the layout feels safe and comfortable. Confirm that you know where the main shutoffs are and that you have chosen three realistic priorities for the following 60–90 days.
If several answers are still “no,” the month was not unsuccessful. Move the unfinished items into a dated plan and continue with the highest-priority one. A useful home system is built gradually.
Frequently Asked Questions
What should I do first after moving into a new home?
Secure the entries, confirm the essential utilities work, test safety alarms, locate the main water shutoff and electrical panel, and check for active leaks or immediate hazards. Then make the bedroom, bathroom, and kitchen functional before tackling the rest of the boxes.
What should a new homeowner complete within 30 days?
By the end of the first month, aim to understand the home’s basic controls and systems, review the inspection findings, organize essential records, confirm administrative details, establish a repair list, and create a short plan for the next few months. The house does not need to be fully decorated or perfectly organized.
Should I hire contractors during the first month?
Hire an appropriate professional when you have a specific problem, safety concern, inspection recommendation, or required service—not because a generic checklist says every new homeowner needs several appointments. Compare credentials, insurance, written estimates, and applicable licensing requirements before authorizing work.
Should I buy furniture and storage immediately?
Buy what you need for safe and comfortable daily life, but wait on nonessential pieces until you understand the room’s measurements, light, traffic pattern, and actual storage needs. Early observation often prevents expensive purchases that do not fit the space or your routines.
What documents should I organize after buying a house?
Keep closing and inspection documents, insurance details, warranties, appliance manuals, utility information, HOA records, repair invoices, receipts, and service notes together. Store sensitive information securely and maintain a backup of important digital files.
What if I cannot finish the checklist in 30 days?
The dates are a prioritization tool, not a deadline for perfection. Complete safety and essential-function tasks first. Schedule the remaining work according to urgency, budget, season, and available time.
Your First Month Should Create Clarity
At the end of 30 days, your home may still contain unopened boxes and undecorated rooms. That is completely normal. Success means something more practical: you can enter securely, use the essential systems, find important documents, recognize urgent repairs, and make informed decisions about what comes next.
Keep the essentials close at first. Observe before buying. Change a layout that makes daily life uncomfortable. Give frequently used categories a logical home. Address small problems before they grow, but do not turn every imperfection into an emergency.
The first month is not a race to finish the house. It is the beginning of understanding it.